- At the far left of the home screen, click the Company tab to display the company navigation tree.
- In the Company Tree, click the company to which the notification will apply.
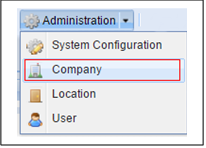
- In the menu bar, click the Administration drop-down.
- Click the Company option in the drop-down. The Administration> Company ribbon bar will appear.
- In the ribbon bar, click the Outbound Messages/Notifications drop-down in the Other box. Note: Depending on your screen resolution, the Other box may not be displayed. If it is not displayed, the Outbound Messages/Notifications Options can be displayed by clicking the ">>" symbol at the far right of the ribbon bar.

- Click the New Outbound Message option.
- The Notifications General Window is displayed.
- On the Message line, click the radio button that reflects the type of message to be sent. Email notifications will be sent to an e-mail address, while HTTP posts will be sent to a URL.
- On the Notification Type line, click the radio button that reflects the type of notification to be sent. Public messages will be available to all users within your company. Any person in the company can subscribe to a public message. Private messages will be delivered to the users directly assigned to the message. The assigned of a private message is described below.
- Type the name of the message in the Notification Name
- Check the Enabled checkbox to allow this notification to be sent. If you are defining this message for later use, leave this checkbox unchecked.
- Use the Notify For drop-down to select the event category that will trigger a notification.

- Use the When drop-down to select specific events that will trigger a notification. For example, if item is selected in the Notify For drop-down, events relating to items will appear in this drop-down.
- Click the Filter tab
- The outbound message can be filtered by many different criteria. Chose the desired criteria on how to apply the outbound message.
- Click the Message tab
- Type the subject of the message in the Subject Line or click the Set Default Subject link to populate the Subject field with a suggested subject.
- A variable is a placeholder enclosed in square brackets that will automatically be populated with information when the notification is sent. For example, if you include the variable [Item Number] in your subject line, the system will insert the item number of the item referenced in the notification. To include variables in the subject line, select the desired variable(s) from the drop-down to the right of the Subject Line, then click the green arrow to insert it. Multiple variables can be inserted.
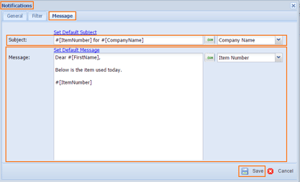
- When the subject line is complete, click the Set Default Subject link to save this subject and to have it automatically inserted into future messages.
- Type the body of the message in the Message field or click the Set Default Message link to populate the Message field with a suggested message.
- To include variables in the message, select the desired variable(s) from the drop-down to the right of the message, then click the green arrow to insert it. Multiple variables can be inserted.
- Click Save to save the changes you have made. If the Enabled Checkbox is checked, a notification message will be generated the next time the selected event occurs.
Note: If this is a public message, the creator of the message will automatically receive a notification when the event occurs. All others will need to subscribe to the message. If this was designated as a private message, users will need to be assigned to this notification before the message can be sent.
Inventory Management