This section will show you on how to create and edit users
Users are always associated with a specific company in the company hierarchy. Usernames must be unique across the MarginPoint system. One way to achieve this is to append the “@” symbol and Company mnemonic for each user.
For example, if users Timothy Tyler, Baker Thomas and Henry Adams are to be added as users in a company called Zed, with a company mnemonic of “XYZ”, then every username entered should end with “@xyz”. Following are the usernames for each user;
Timothy Tyler - ttyler@xyz
Baker Thomas - bthomas@xyz
Henry Adams - hadams@xyz
6.1 User Types
There are two types of users that can be created in MarginPoint 8.
1. POU Users – these are users that only need access to the Point of Use (POU) machines. These users require minimal data to be entered in to the MarginPoint in order to allow users access to a POU device.
2. Admin Users – these are users that will require access to either MarginPoint 8 via a browser or through a mobile device. These users require more information to be input in order to gain access to the application.
6.1.1 Creating New POU Users
A POU user can be quickly created with the New POU User function. POU users will only have access to POUs to issue out inventory and nothing else. The only information needed to enter is First, Last Name, Badge ID and PIN. All other settings will be set to default or entered by the system.
1. At the far left of the home screen, click the Company tab to display the company navigation tree.
2. Click the user’s company in the Company Tree.
3. Click the Administration drop-down.
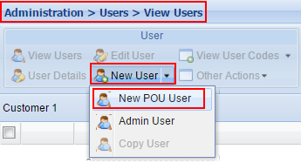
4. Click the User option in the drop-down. The Administration > Users > View Users screen will open, listing all users assigned to the selected company.

5. Choose New POU User from the New User drop-down
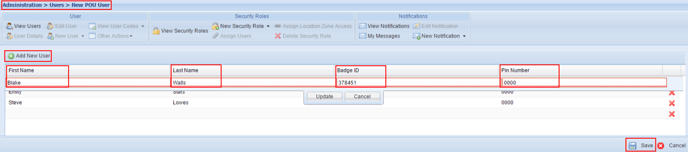
6. The Administration > Users > New POU User screen will open
7. Click Add New User
8. To create a New POU User you are required to enter only the:
a. First Name
b. Last Name
c. Badge ID
d. Pin number
9. After filling in all the fields click on Update
10. You can repeat steps 7 through 9 to continue adding additional POU users
11. Click Save in the bottom right hand corner when done